Now that you have the product you need, the hard part is figuring out where to spray the stuff! Luckily, GoWesty has your back.
Here are some subtle details to notice that we have arrived at by much trial and error:
The first is in the threshold area. You will notice that the soft plastic threshold mat is gone, and the holes for it have been filled and texture applied. This area is a common rust-prone area on Vanagons. The plastic threshold mats are normally held in place with glue and round grommets which are molded into the step pad. These grommets push through holes in the body, through to the outside of the vehicle. It is through these holes that water enters the vehicle and is trapped under the step pad. The moisture sits there and rust begins. By eliminating the step pad and holes entirely, and sealing this area inside and out, the durability and looks of this area are greatly improved. The texture is continued up along the carpet area where the paint is typically worn through from years of entering and exiting the vehicle.
Another detail to notice here is how the black texture along the wheel arch turns and goes inside. It looks a bit goofy when the door is open, but when it is closed (as is the case 99% of the time), it creates a consistent line of black in the door jamb area. Without this detail, when the door is closed, there is an incongruent looking strip of painted body between the black texture on the wheel arch and on the door itself--another lesson we learned on my van. I left it that way to show people why we don’t do it that way anymore.
Note: This is a good time to, using a hammer and dolly, bend the front fender lip up and out of the way of the front tire. Snagging the front fender lip is a super common issue on any Vanagon with larger tires, especially if it has been lowered. You can’t see it in the photos, but it is done on this van—and we highly recommend it be done on all vans.
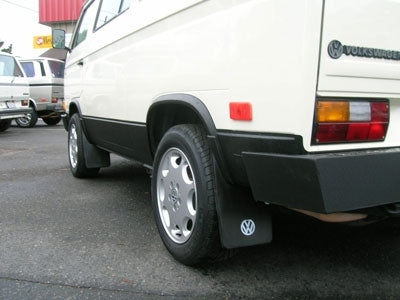
Yet another subtle detail is how the texture is applied a bit lower from the front doors forward as compared to aft of the front doors. On the front doors, the black texture drops to the lower edge of the depression stamped in the body. This is intentional in order to smoothly follow that same, lower edge around the front of the vehicle, yet another lesson learned on my Vanagon. If this were a later model Vanagon with plastic bumpers and 'ground effects' panels mounted on the front doors (1988-91), there would be four holes in this section of each door that would need to be welded up and smoothed over before the black texture is applied. You will notice on this Westy that the one and only original mud flap located at the front left is gone, and the two holes in the body are gone and textured over. Instead, it has a set of mud flaps that fit along the wheel arch, a South African OEM Volkswagen item we also carry.
The final detail is how the black texture gracefully curves down at the rear corners. It is not a complicated or difficult detail, but you can imagine how ugly this detail could be if not executed with some care.
Any decent body shop can handle this work. It is not rocket science, rather something closer to fine art. Armed with this article, and the images we provide, you should end up with something that looks well thought out, and provides excellent road-debris protection for your beloved van!


